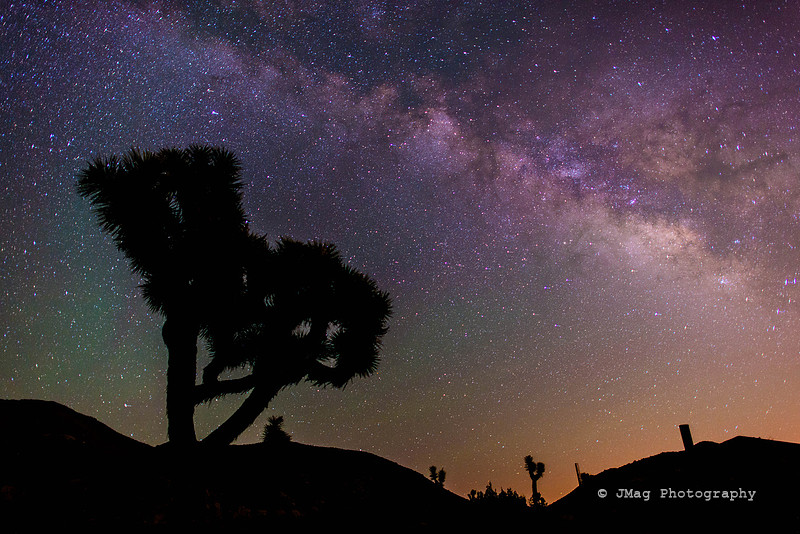
Shooting the Milky Way"I wonder whether the stars are set alight in heaven so that one day each one of us may find his own again. . ." - Antoine de Saint- Exupéry, The Little Prince
At the end of May, I went to Joshua Tree to photograph the night sky. My goals were to shoot still stars, star trails, and hopefully the Camelopardalids meteor shower that was going on during that time. I am not an expert at this - there are photographers who specialize in this type of photography. For this post, I’ll discuss shooting the Milky Way as my chosen subject in the night sky and share what I have learned so far. I think being proactive in this type of photography is crucial. What I mean by this is that you must know what conditions to expect, arrive early, know how much available night-light there will be, and compose the shot while there is still daylight. It’s not easy to find good compositions in total darkness . . . I speak from personal experience :-) There is no exact science to nighttime photography, but knowing a few variables and rules beforehand will yield better results faster, and, once you have done it a lot, you will have a more intuitive approach to the whole process - as with everything else we do a lot :-) EQUIPMENT NEEDED
GENERAL CONSIDERATIONS FOR SHOOTING THE SKY AT NIGHT Hopefully, you have found a pleasing composition, and you have set up your camera and locked your focus before total darkness. Generally, for nighttime photography, forget about your light meter because it’s not going to work in total darkness. In order to determine exposure, I take a high ISO test shot. I check my LCD screen and my histogram to evaluate the high ISO test shot and adjust as necessary. I always strive to get the best exposure in camera and, in this instance, I prefer a slightly brighter exposure because I can always darken the image (but recovering shadows in a very underexposed capture will introduce a lot more noise). I can now compensate the exposure and use my “exposure tripod” consisting of Shutter speed, Aperture, and ISO. Every situation calls for a different approach, and it is as much a creative choice as it is a technical choice for how I use these variables. The exact same exposure will produce different looking photographs depending on which variable I change. Experiment!
HIGH ISO TEST SHOT
A dark sky without any light pollution is the first requirement in night sky photography. It’s impossible to even see the Milky Way otherwise. The moon also has an effect on its visibility, so it is good to know what phase the moon will be in. The moon travels 28 days around earth. During this time the moon takes on different shapes and its luminosity will change greatly. What is possible to photograph in those varying conditions varies greatly. To shoot the Milky Way, it is best to go out during a new moon. I use the Photographers Ephemeris to find out about the moons exact position. Other atmospheric conditions such as rain, thick cloud covers, humidity, and wind will affect this endeavor and create challenges to be aware of. In some of those conditions, we may have to stay home.Also, the time of year needs to be considered. Here in the northern hemisphere, the Milky Way is best seen during the first half of the year. Depending on where you are located, summer can be very humid and may also create some challenges. You will find the Milky Way in the southern hemisphere of the sky rising from the west. To shoot the Milky Way in the night sky, I set my camera on a very sturdy tripod, in manual mode, shooting in RAW format, auto white balance, remote trigger in place so I do not introduce camera shake, and use a wide-angle lens. I love the Nikon 24mm f/1.4 for this type of photography. I have also heard very good things about the Rokinon 16mm f/2 which is also a very affordable choice; again, the lens choice also depends on the particular creative vision you have, but, generally, a wide lens is a good starting point. 500 RULE Now, in order to capture still stars, we need to be aware that the earth is rotating. In order to get still stars, we need to apply the 500Rule (some use the 600Rule); for ultimate sharpness, though, stick to the 500 Rule. To get sharp, in focus stars, we need to divide 500 by the focal length of the lens being used. For example, in my case, I had a full frame camera crop factor 1.0x with a fixed 24 mm lens (500x1:24 = 20.83), so I will set my shutter speed at a maximum to 20 sec (if you are working with a crop sensor camera you need to consider that particular factor as well 1.5x, 1.6x etc.). There are many great apps to calculate this with. The one I use has an assortment of camera and lens combinations and will quickly calculate your maximum possible shutter speed for your particular lens/camera combo Long Exposure Calculators by Ilya Genkin photography. So, this now makes us realize the challenges we face when shooting still stars, and it is up to us how we are using Aperture or ISO to find a satisfying exposure. Higher ISO will introduce more noise, but too low of an ISO will make the stars appear a little too faint. Different cameras will have different capabilities in shooting in low light and how much noise will be introduced at higher ISO’s. It’s up to the photographer to make that call. In my next post, next Tuesday, I will write about how I captured star trails.
Comments
jannah(non-registered)
realy amazing:-)
No comments posted.
Loading...
|